Getting an SSL certificate installed isn't the technical nightmare it used to be. The whole process boils down to three main parts: generating a Certificate Signing Request (CSR), getting your domain ownership verified by a Certificate Authority (CA), and finally, uploading the certificate files to your hosting control panel. If you're using a common platform like cPanel, you'll find the whole thing is pretty guided and can be wrapped up in less than 30 minutes.
Why Your Website Needs an SSL Certificate Today
Before we get into the nuts and bolts, let's talk about why this is no longer a "nice-to-have" feature. An SSL certificate has moved from being a simple tech add-on to a non-negotiable part of any modern, credible website. At its core, it creates a secure, encrypted link between your visitor's browser and your server, scrambling any data sent between them.
Think of it like sending a sealed, tamper-proof envelope instead of an open postcard. This layer of protection is absolutely essential for any site handling sensitive information.
The Core Benefits of SSL
Security is just the beginning. The real-world benefits stretch into user trust and how you show up in search results. When someone lands on your site and sees that little padlock icon and "HTTPS" in the address bar, it's an instant signal that you're legitimate and professional. In fact, browsers like Chrome now actively flag sites without an SSL, scaring off potential customers and spiking your bounce rate.
This trust signal is so important that search engines have baked it right into their algorithms. Years ago, Google confirmed that HTTPS is a ranking factor. It's a small boost, but in a competitive market, it gives secure sites a clear advantage over those that aren't. The message couldn't be clearer: security is a huge part of a great user experience.
An SSL certificate does more than just lock down data; it builds visitor confidence and has a direct impact on your website's visibility in search results. It’s a foundational piece of your credibility online.
When you boil it down, running a site without an SSL certificate today means you're actively choosing to:
- Lose visitor trust: People are trained to look for the padlock. If it’s not there, they’ll often just leave.
- Hurt your SEO: You're willingly giving up a clear ranking signal that your competitors are almost certainly using.
- Risk data security: Any information submitted on your site—even through a basic contact form—is exposed and vulnerable without that encryption.
Choosing the Right SSL Certificate for Your Needs

Before you can even think about installation, you’ve got to pick the right tool for the job. Not all SSL certificates are the same, and the one you need really depends on two things: how much trust you need to signal (the validation level) and how many domains or subdomains you're covering.
Think of it like getting an ID. A Domain Validated (DV) certificate is the most basic, like showing a library card. It confirms you control the domain, and that's it. The whole process is automated and often takes just minutes. This is perfectly fine for blogs, personal portfolios, or any site that isn't asking for sensitive user information.
Stepping it up a notch, an Organization Validated (OV) certificate is more like a driver's license. The Certificate Authority (the company issuing the SSL) actually verifies that your business is a legitimate, registered entity. This takes a few days because a human is involved, but it adds a visible layer of trust for your visitors.
Then there's the big one: the Extended Validation (EV) certificate. This is the passport of the SSL world. It involves a deep, thorough background check into your business's legal and operational standing. While modern browsers have toned down the "green bar" visual cue, an EV certificate remains the gold standard for e-commerce stores, banks, and anyone handling seriously sensitive data.
Which SSL Certificate Is Right for You?
This table breaks it down, helping you match a certificate's trust level to what your website actually does.
| Certificate Type | Validation Level | Ideal For | Visual Trust Signal |
|---|---|---|---|
| Domain Validated (DV) | Basic domain control check | Blogs, portfolios, info-only sites | Padlock icon |
| Organization Validated (OV) | Business identity verification | Corporate sites, lead-gen forms | Padlock & company info in details |
| Extended Validation (EV) | In-depth business vetting | E-commerce, finance, sensitive data | Padlock & higher trust indicators |
Ultimately, choosing the right validation level comes down to the kind of trust you need to build with your audience.
Matching the Certificate to Your Site's Footprint
Once you've figured out the validation level, you need to match the SSL to your website's structure. Are you securing just one site, or a whole family of them?
- Single Domain: Just like it sounds. This certificate secures one specific domain, like
yourwebsite.com. Simple and straightforward. - Wildcard: This is your best friend if you use a lot of subdomains. A single Wildcard SSL for
*.yourwebsite.comwill automatically secureblog.yourwebsite.com,shop.yourwebsite.com, and any others you might add later. It's incredibly efficient. - Multi-Domain (SAN): Got a few different websites? A Multi-Domain certificate lets you secure totally separate domains—like
yourfirstsite.com,yoursecondsite.net, andanotherbusiness.org—all under one certificate.
For most folks just starting out, a free DV certificate from a provider like Let's Encrypt is a fantastic option. In fact, many quality hosts, including Hosting Tap, bundle one with their plans. But if you’re taking payments or collecting personal info, leveling up to an OV or EV certificate isn't just an expense; it's a smart investment in customer confidence.
Generating Your Certificate Signing Request (CSR)
Now that you've picked the right certificate, it's time for your first real hands-on step. This is where you create a Certificate Signing Request, or CSR.
Think of the CSR as your formal application for an SSL certificate. It's just an encoded block of text, but it contains all the key information that identifies your server and domain to the Certificate Authority (CA).
Thankfully, generating this isn't nearly as intimidating as it sounds. Most modern hosting control panels, like the cPanel we provide at Hosting Tap, have built-in tools that make this process a breeze. You'll usually find an "SSL/TLS Manager" or a similar security section where you can get this done in minutes.
What Information Will You Need?
Accuracy here is everything. The details you provide must perfectly match your domain and company records. Any little mismatch will cause the CA to reject your request, and you'll have to start all over again.
Before you begin, it's a good idea to have these details ready:
- Common Name (CN): This is the big one. It has to be the exact, fully qualified domain name you want to secure. For example,
www.yourwebsite.comorshop.yourbrand.com. - Organization: The legal name of your business. If you're an individual, you can often just use your full name here.
- Organizational Unit (OU): This is just the specific department, like "IT" or "Marketing." Honestly, this is often optional.
- City/Locality: The city where your organization is legally based.
- State/Province: Make sure to write out the full name of your state or province, no abbreviations.
- Country: Just the standard two-letter country code is needed (like US for the United States).
A crucial part of this process is creating your private key, which happens at the same time you generate the CSR. This key is your digital secret. It absolutely must stay on your server and should never, ever be shared. It’s the other half of your public certificate and is what makes the secure connection possible.
Once you fill out the form in your control panel and hit "Generate," two things are created: the CSR text (which you'll copy and give to your CA) and the private key (which your server saves automatically). Getting this right is a foundational step in learning how to install a SSL certificate correctly from the get-go.
Navigating the Domain Validation Process
Alright, you've submitted your CSR. Now comes the part where the Certificate Authority (CA) needs to make sure you actually own the domain you're trying to secure. Think of it as a quick ID check before they hand over the keys. It's a fundamental security step that stops anyone from getting an SSL certificate for your website.
The good news is you usually get to pick how you want to prove you're the owner. There are typically three ways to get this done.
Common Validation Methods
Which method you choose really just boils down to what's easiest for you to access. Can you get into your website’s email? Or is uploading a small file to your server quicker?
- Email Verification: This is often the simplest. The CA will fire off an email to a generic admin address associated with your domain, like
admin@yourdomain.comorwebmaster@yourdomain.com. All you have to do is find that email and click the verification link inside. Done. - File-Based Validation: For this one, the CA provides a specific text file. Your job is to upload that file to a particular folder on your web server. Once it's there, their system will automatically scan your site to find it, confirming your control.
- DNS Record Validation: If you're comfortable with your domain's DNS settings, this is a great, clean option. You'll be asked to add a specific TXT or CNAME record to your domain's DNS. Since only the domain owner can do this, it's solid proof of ownership without ever touching your website files.
No matter which path you take, the most important thing is to act on it quickly. I can't tell you how many times I've seen an SSL installation get stuck simply because the validation step was delayed. A fast response here means you get your certificate files right away, without any hold-ups.
Once the CA confirms you're the rightful owner, they'll issue and send over the certificate files. For a standard Domain Validated (DV) certificate, this whole process can take just a few minutes. You'll typically get a .crt file, which is your main certificate, and a CA Bundle file containing the necessary intermediate certificates.
These files are the final pieces of the puzzle. The infographic below breaks down the simple three-step process of getting them installed on your server.
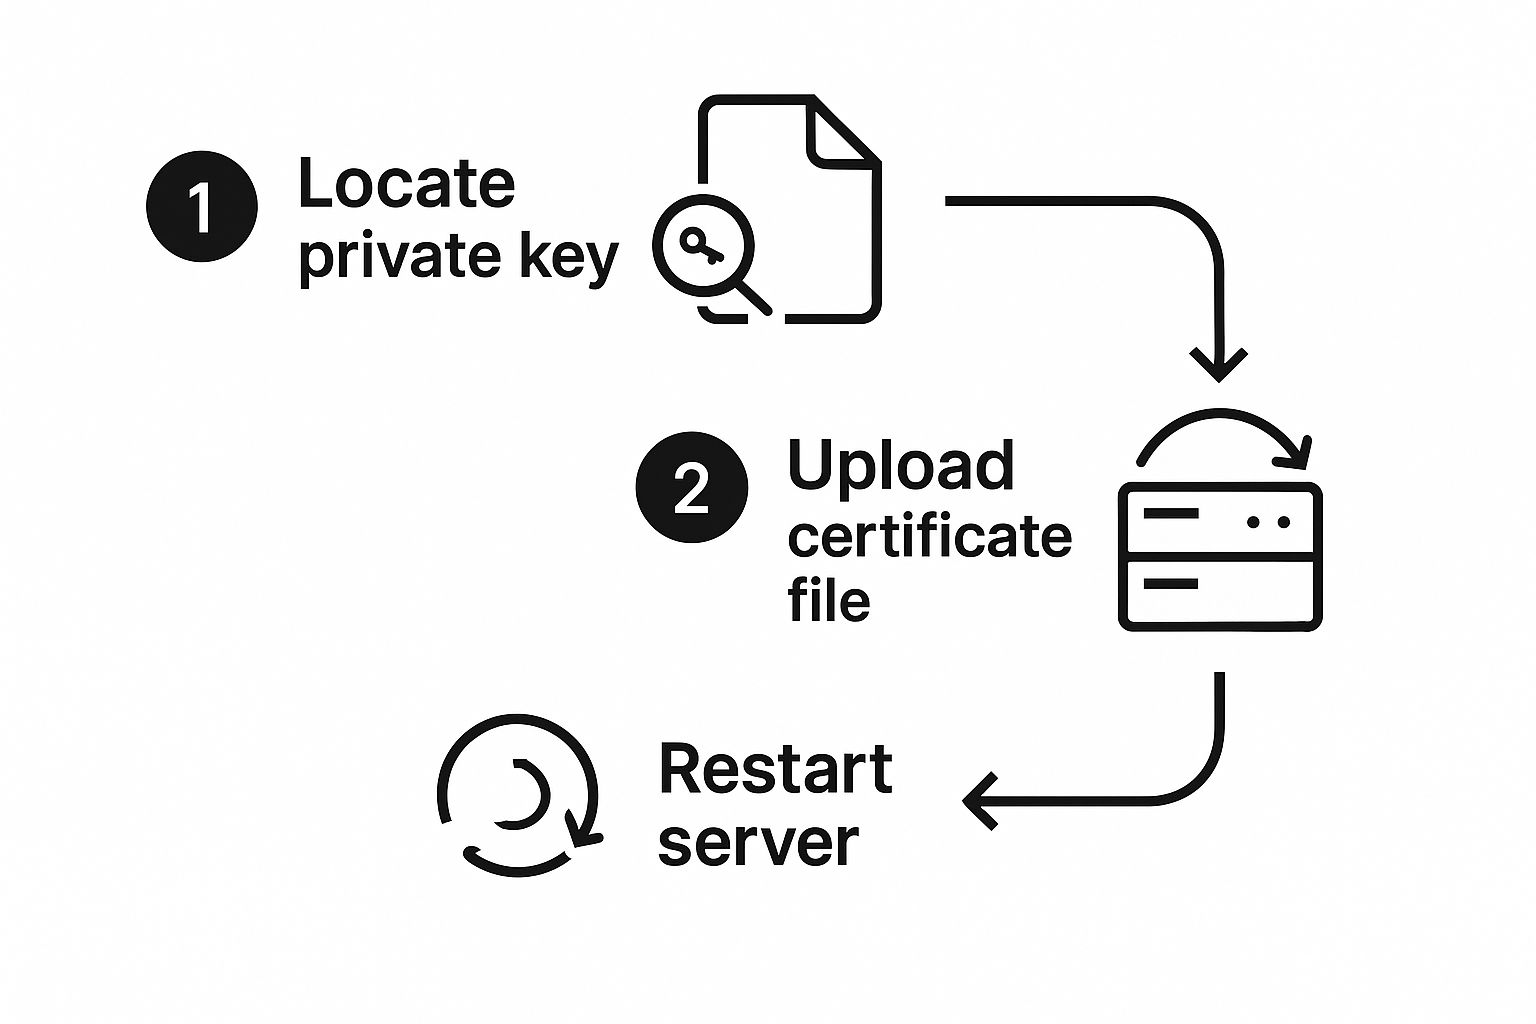
As you can see, the final install is a pretty straightforward sequence: you'll locate your private key, upload the new certificate files, and then restart your web server to make the new SSL certificate live.
Installing the SSL Certificate on Your Server
Alright, you’ve made it through the validation process and have your certificate files ready to go. This is the final, and honestly, the most satisfying step. It’s where everything comes together.
The good news is that most modern hosting platforms, like the cPanel we use at Hosting Tap, make this part surprisingly simple. The main goal here is to get your new certificate, private key, and CA Bundle into the right spots on your server.
First things first, log into your hosting control panel and head to the security section. You're looking for something called “SSL/TLS Manager” or just “SSL/TLS.” This is basically your command center for all things encryption.

Populating the Certificate Fields
Once you're inside the manager, find an option that says something like “Install and Manage SSL for your site (HTTPS)” or “Manage SSL sites.” Clicking this will bring you to a page with a few large text boxes waiting to be filled. They're typically labeled:
- Certificate (CRT): Grab your main certificate file—it’s usually named
your_domain.crt. Open it with a basic text editor, copy everything inside (including the-----BEGIN CERTIFICATE-----and-----END CERTIFICATE-----lines), and paste it here. - Private Key (KEY): Your server should have this stored from when you generated the CSR. In cPanel, there's often a handy “Autofill by Domain” button that just pulls the correct key for you. If that's not an option, you’ll have to pop over to the “Private Keys” section of the manager to retrieve and paste it in yourself.
- Certificate Authority Bundle (CABUNDLE): This file is what connects your certificate to a trusted root authority, proving its legitimacy. Open the CA bundle file (it might be called
ca-bundle.crtor something similar), copy the entire contents, and paste it into this last box.
With all three fields filled out, just hit the "Install Certificate" button. Your server will take a few seconds to work its magic, and you should see a success message pop up. And just like that—your site is officially rocking HTTPS.
What About Other Platforms?
While the cPanel method is super common, the process can look a little different depending on your hosting environment.
On a Plesk server, for instance, the workflow is almost identical, but you'll find the tools under "SSL/TLS Certificates" for your specific domain.
If you’re managing your own server, things get a bit more hands-on. For Apache, you’ll need to directly edit a configuration file to point to your certificate and key files. For Nginx, you'll be modifying your server block configuration to do the same.
The global push for a secure web means these skills are more important than ever. In fact, as of mid-2025, SSL certificate adoption has skyrocketed, with over 305 million active certificates detected across the internet. You can find more SSL statistics that really highlight how standard this practice has become.
Now for the final check. Use a free online SSL checker tool to scan your domain. It will run a quick diagnostic and confirm that your certificate is installed correctly and trusted by all the major browsers. This gives you the official green light and that beautiful padlock icon you've been working toward.
Essential Checks After Your SSL Is Live
Getting that little padlock icon to show up is a great feeling, but your job isn't quite done yet. Before you pop the champagne, there are a few crucial clean-up tasks to take care of. Skipping these can create a messy experience for your visitors and confuse search engines, potentially hurting the SEO you've worked so hard to build.
First up, and arguably the most important, is to make sure your entire site defaults to the secure connection. You’ll need to set up 301 redirects to automatically forward anyone trying to visit an old http:// page over to its shiny new https:// version. This is non-negotiable for preserving your link equity and ensuring nobody lands on an insecure page by mistake.
Fine-Tuning Your Secure Site
With redirects in place, it's time to play detective and hunt down any "mixed content" warnings. This is a super common hiccup that happens when a secure https:// page tries to load insecure elements—like images, scripts, or stylesheets—that are still using an old http:// URL. Most modern browsers will throw up a security warning, which is a surefire way to scare off visitors.
Think of mixed content as leaving a window unlocked after securing the front door. It undermines the trust you've just built. Resolving these warnings is a crucial part of a successful SSL installation.
Finally, you need to let Google know you've moved. This is a critical step for maintaining your search rankings and making sure the transition is seamless from an SEO perspective.
Here’s your checklist:
- Update Google Search Console: You'll need to add the
https://version of your website as a completely new property. This tells Google to start crawling and indexing the secure version of your site from now on. - Submit Your New Sitemap: Double-check that your sitemap only contains the new
https://URLs for all your pages. Once that's confirmed, submit it through your new Search Console property. - Schedule Your Renewal: Most SSL certificates are only valid for about a year. Do your future self a favor and set a calendar reminder right now—for at least a month before it expires—to avoid any last-minute panic or, even worse, website downtime.
Common Questions About SSL Installation
Even when things go smoothly, a few questions always pop up when you're installing an SSL certificate for the first time. Getting these sorted out ahead of time can save you from hitting common snags and helps you understand the security choices you're making.
Free vs. Paid SSL Certificates: What's the Real Difference?
Here's the thing: both free certificates (like the ones from Let's Encrypt) and the ones you pay for offer the exact same level of encryption. Your data is just as scrambled and secure with either one.
The real differences come down to three things: validation levels, customer support, and warranty.
- Paid certificates can offer Organization (OV) or Extended Validation (EV). These require a manual check of your business's legal details, which gives visitors a much higher signal of trust.
- Free certificates are almost always just Domain Validated (DV), which is a quick, automated check that you control the domain.
- Support & Warranty: With a paid certificate, you get access to dedicated support and a warranty that protects you against certificate-related failures. With free options, you're generally on your own.
How Long Does This Whole Installation Take?
This really hinges on the validation level you choose. For a standard DV certificate, you can go from generating your CSR to seeing that little padlock in the browser in as little as 15-30 minutes. It's impressively fast.
But if you're going for an OV or EV certificate, you'll need to be more patient. The process can take several business days because the Certificate Authority has to manually verify your organization's legal identity before they'll issue it.
What Happens If My SSL Certificate Expires?
This is something you absolutely want to avoid. If your certificate expires, anyone visiting your site will be hit with a big, ugly browser warning screaming that your site is "Not Secure."
That warning is an instant trust-killer. Most people will immediately click away, assuming your site is compromised. It’s critical to renew your certificate before it expires to keep everything running smoothly and securely.
Ready for fast, secure, and reliable hosting that makes SSL installation a breeze? Hosting Tap offers everything you need to get your website online and protected.
Article created using Outrank